My lovely sister, Kristy, joined me for the day, as well as Mira and Yvonne! Kristy and I took the same sessions while Mira and Yvonne went off on different culinary adventures.
Our first session of the day, after a great morning keynote by Nature's Green Acres, was Cheesemaking!

Mozzarella. The bane of my cheesemaking existence.
I've tried to make it 3 times before at home. Alas, all I have accomplished was complete and utter failure.
Until today. The day I met Chef Allan Roote of NAIT!

He was an excellent teacher! No wonder NAIT scooped him up... He'll also be instructing NAIT's upcoming Artisan Cheese Program.
We used an adaptation of Ricki Carroll's 30minute Mozzarella. A recipe I have used before with little to show for my effort.
I had followed all the directions!
Don't heat the milk too fast.
Don't over heat the milk.
Use good quality milk.
Add your ingredients at the right stages. Make sure they're measured out correctly.
etc etc
My problem.
I had been using whole milk (3.25% milk fat).
Mozzarella works BEST with 1% or 2% milk!!!!!

First we added the pre-measured and dissolved citric acid into our pre-measured milk, stirring slowly but constantly as we poured it in.
Then, the milk is SLOWLY heated up (burner on LOW). The slower the milk is heated, the better the cheese.
The whole time the milk was heating, we were stirring. Gently, of course. No spoons were allowed to scrape the bottom of the pots!
Poor Kristy's burner... even though it was set on low her milk heated up fast and over temperature.
The rest of the session we (including Chef Allan) were trying to save it, but it basically turned into a mushy ricotta....
Still, her failure in class was still WAY better than anything I had made at home.
Don't worry, she still got to take home some mozzarella.
We were in the same room for French Macarons afterwards so when Chef Allan came back to finish a cheese someone had abandoned he let Kristy finish it with him and she got to take it home :) What a great guy!

After the milk comes to temperature, 90F, remove it from the heat and add the dissolved rennet (pre-measured for us).
Stir constantly but slowly when adding the rennet, going in a bottom-to-top motion (up and down motion). Take care not to agitate the milk for more than 30seconds after adding the rennet.
The milk was then left off the heat to form a curd mass...

After the milk has sat for AT LEAST 5minutes, you may check to see if the curd has set enough.
Chef Allan showed us a "surface cut" technique. You take the handle of the spoon and gently "cut" the surface of the curd.

Then you slide in the tip of the handle perpendicular to the cut you made to see if it creates a clean break.
When the milk is set you'll also see a clear whey forming around the edge of the pot.
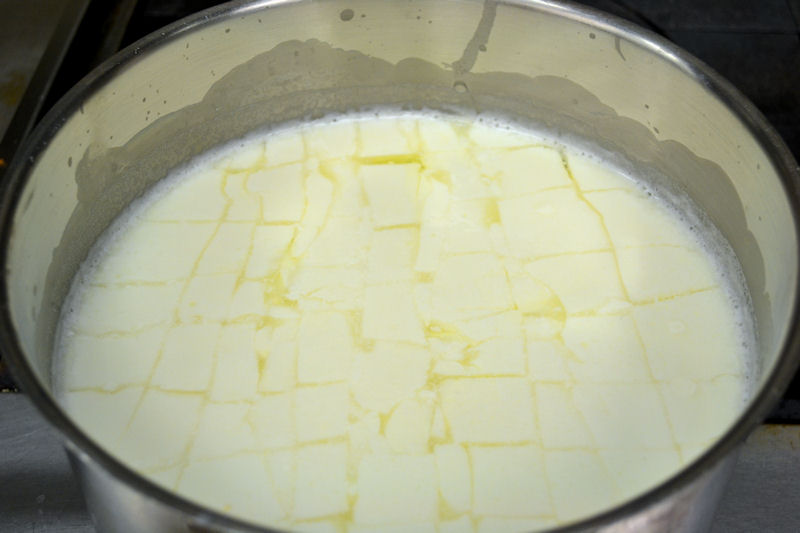
Once we determined the curd was set, we then took the handle of our spoon (such a handy tool!) and cut the curd mass into 1inch checkerboard squares.
As evenly as you possibly can.
There's a fancy cutting technique that I'm sure Ricki shows on her site (link at top of post).
You can see the whey starting to separate from the cut curds.

(The milk is still off the heat at this point)
After cutting we left it undisturbed once again for at least another 5minutes.
Then, it's back onto the stove top, low heat of course.
We stirred with our hands, gently bringing the curds from the bottom of the pot to the top.

We did this until the curds reached their next temperature point, 105F.

Look at all the lovely curds!
Then it was time to strain (which I didn't get a picture of...)
You could reserve the whey to add to bread dough/pizza dough, feed to cats/dogs/piggies, etc.
We didn't save the bulk of it, just a bit to add to the ice bath so the salt we added to the cheese didn't leach out into the water.

Here's what mine looked like after straining.
The curds are still soft and there's still whey seeping from them.
It then gets zapped for 1minute.
Since I don't have a microwave at home anymore, I would use the waterbath method.

This is the curds after a minute of microwaving.
1 tbsp of salt was added and then the kneading and stretching began!
The more you work the curds, the drier the cheese.
Dry mozzarella is great for grating to use on pizza, in lasagna, etc.
A fresh moist mozzarella is a real treat on a cheese or charcuterie platter. I made a moist mozzarella.

This is one of my bench-mates working the salt into the cheese.
You can see little tears on the surface of the cheese, that means it needs to get microwaved again to soften the curd up.
Which she did, don't worry :)
Sometimes it gets microwaved up to 3 or 4 times, as the curd has to be really hot to stretch.
It was a drier cheese, perfect for pizza!

Here is the end product!
A lovely moist ball of fresh mozzarella!
It gets put into an ice bath with whey to cool off.
It pays to be stubborn sometimes... I could've given up on cheesemaking after 3 failed attempts at an "easy" recipe.
But I didn't.
My reward is CHEESE! :)

Thanks Eat Alberta! Thanks Chef Allan!
I can't believe you managed to get a post up already! KUDOS! It really was such a great and encouraging class. I already have rennet at home and am en route to buy citric acid before the day is out. We'd be silly to not make that again!
ReplyDeleteThanks :)
DeleteI knew if I didn't get started on it right away it would get put off way too long :P
I'm going to make some more at home later this month. See if I can't make cheese strings from it for my nephew :)
Nice! Cheesemaking is on my to-do list this year. Looking forward to it.
ReplyDeleteSo much fantastic content yesterday, and what an outstanding facility to have the classes in. Perfect.
NAIT really did go above and beyond! The kitchens and staff were amazing.
DeleteI'm hoping next year maybe they'll be a couple of advanced sessions of some of the topics we did this year...
I have rennet, citric acid, etc if you want a bit to try it out at home before buying a huge amount. I'll be at Val's on tuesday, I could bring some then... just shoot me an email or tweet lol
HI, Deb!
ReplyDeleteWHAT an incredible POST! This was THE class I wanted to go to the most as I have never made this, yet! Everything else, I have done! Your curds look stellar! Bravo to you! I think I was more excited that you were to see your cheese - and thank you for the taste! It was YUMMY!!!!
(The meeting Tuesday is closer to your house, I think - Inglewood Public Library - address on the slow food website.)
See you then!
XO
Valerie
Yes, yes it is (Idylwyld Branch, walking distance!).
DeleteI remembered that after I wrote that lol
Perhaps I'll bring a bunch of pre-measured rennet and citric acid that ppl can take home if they like... with instructions, of course :)
Mmm that looks sooo good! Hubs is the cheese maker over here and he's yet to have tackled mozzarella. I may have to continue to try and convince him....
ReplyDeleteYes! Do it!
DeleteLike I said in the post, I failed 3x at home before getting it right, finally.
He can learn from my mistakes lol
Got all excited again about the ball of mozza in my fridge reading your post ;) So excited for the end of April...once school is officially over, I can experiment with all sorts of foodie things :) P.S. Great to meet you yesterday!
ReplyDeleteGlad to see your cheese worked out! I'd tried making the same thing, pretty much same recipe the weekend before and failed. Likely because we used goat's milk, too fatty! Was a bit disappointed I failed again, but c'est la vie!
ReplyDeleteKeep trying! I'm sure it'll eventually work out :)
DeleteNow that you've tried a couple of time you'll know what to expect. Hopefully that'll give you the upper hand and give you some delicious cheese!
This looks divine! I think I might try it at home - following your super detailed instructions!
ReplyDelete